

How To Take A Photo On Windows 10
Windows 10 makes enjoying digital photos easy. You tin can take photos with the Camera app with the built-in camera found in many laptops and tablets.
-
Select the Camera app on the Start screen.
If you lot don't have a webcam, the app screen displays Please connect a camera. If yous don't accept a built-in webcam, or the resolution of the i yous have is too low, you can easily add a webcam. Only plug the photographic camera into your computer — it's that easy.
You can choose from many good webcam models. Generally, get the highest video resolution you can beget, because you'll probably use the camera for video chats. Consider the size of the camera, its zipper to your reckoner, and whether information technology has a microphone (yous definitely need a microphone).
The start time you use the Camera app, the screen displays Allow Windows camera access your location?
-
Select Yes to keep. (If you don't desire to go on, don't choose No unless y'all never await to use this app. Instead, just switch back to the Windows desktop.)
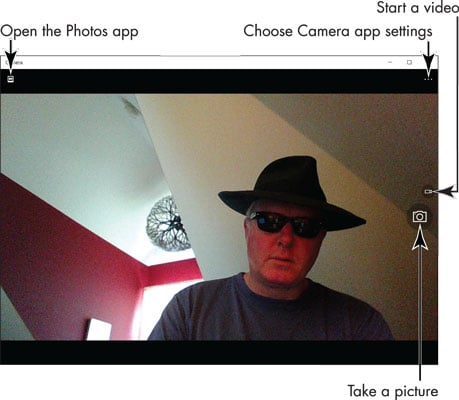
The Photographic camera app opens, and at that place'southward a good chance you recognize the confront staring back at yous. Very likely the face isn't wearing dark glasses like the debonair guy shown.
-
To accept a photo, grinning and then click or tap the Photographic camera button.
You may hear a shutter click. Your photograph is placed automatically in a binder called Camera Roll in the Pictures binder.
-
If y'all see a Change Camera option, select that choice.
Many tablets and laptops have 2 cameras, i that faces you and one that points in the reverse direction. Switch to the camera away from you when you want to use your calculator for something other than a self-portrait. Take another film — they're free. Select Modify Photographic camera once more to switch back to see yourself.
-
Select the Settings button located in the upper-right corner of the Camera window.
A panel appears with two options: Self Timer and Settings. Select Self Timer. The Self Timer panel opens. Choose a Delay choice — 2, 5, or 10 seconds — to pause earlier photos are taken, and and then select the cheque mark at the lesser of the window. You return to the Photographic camera screen.
Select the Camera button to take some other photo. A countdown timer appears, giving you a few seconds to compose yourself. To turn off this feature, return to the Cocky Timer panel and select the Ten button (not the check mark).
-
Select the Video button.
Naught happens until you click or tap the button a second fourth dimension, at which signal you're in moving pictures. A counter indicates the length of the video. Short is sweet in video. You tin speak, besides. Click or tap the Video button to stop the video.
Equally with photos you take with the Photographic camera app, videos are saved initially in the Camera Gyre subfolder of the Pictures binder. Select the Video button once again to turn off the video part and render to taking nevertheless photos (with the adjacent click or tap).
Well-nigh This Article
This article can be constitute in the category:
- Windows 10 ,

How To Take A Photo On Windows 10,
Source: https://www.dummies.com/article/technology/computers/operating-systems/windows/windows-10/how-to-take-photos-and-videos-with-the-windows-10-photos-app-141665/
Posted by: morrisonwastoponcen.blogspot.com
0 Response to "How To Take A Photo On Windows 10"
Post a Comment